Migrate Gmail to Office 365
Are you planning to switch from Gmail to Office 365? Whether you're an individual moving from a personal Gmail account or a small business owner migrating company email to Office 365 for Small Business, it’s important to approach the process with a clear plan.
Migrating from Gmail to Office 365 involves more than just moving emails. You would need to ensure that all your emails, folders, attachments, and read/unread statuses are transferred accurately.
In this step-by-step guide, you'll learn how to:
-
Prepare your accounts for migration
-
Transfer emails from Gmail to Office 365 using free and paid tools
-
Ensure nothing is lost in the process
By following the steps in this article, you’ll be able to migrate Gmail to Office 365 with no issues.
G Suite is the legacy name of Google Workspace, while Office 365 is the legacy name of the Microsoft 365 package. This article uses these names interchangeably.
- How to Migrate Gmail to Office 365 Step by Step
- Method 1: Migrate from Gmail to Office 365 Small Business or other using VaultMe
- Method 2: Migrate from Gmail to Office 365 manually for free
- Method 3: Migrate from Gmail to Office 365 using Microsoft's IMAP migration tool
- FAQs about Gmail to Office 365 migration
- Quick resume
- Related articles
How to Migrate Gmail to Office 365 Step by Step
Migrating your Gmail email to Office 365 might seem complex, but breaking it down into clear, actionable steps can make the process easier to manage.
In this section, we'll provide a general overview of the Gmail to Office 365 migration process. You can use this step-by-step plan as your Office 365 migration checklist.
In further sections, we'll explain the two migration methods in detail.
G Suite to Office 365 migration checklist:
- Plan and prepare.
Consider whether you need to migrate only emails or contacts, calendars, and Drive files as well. Prioritize the content critical to your workflow to avoid unnecessary clutter in Office 365.
Then, decide on the timeline. The time required for the migration depends on the number of mailboxes you plan to migrate and the amount of data you have. Assess your deadline and work backward to allocate sufficient time for each stage, including preparation, migration, and verification. Keep in mind that larger migrations may take several days.
- Back up critical data.
Before initiating the migration, create a backup of your most important emails and documents. For example, you can download your email archive into a .pst file and store it on your hard drive.
While automated migrations are reliable, manual methods do not always work as expected. If you are thinking of migrating email manually using free methods, having a backup ensures you can recover the data if necessary.
- Choose a G Suite to Office 365 migration tool.
There are two approaches to migrating emails: automatic and manual. The choice depends on multiple factors, including the scope of your migration and the availability of resources. For more information on what you should consider when choosing a migration method, see this article: How to Migrate to Microsoft 365.

- Create an Office 365 account and activate OneDrive.
If you haven’t already, set up your Office 365 subscription and create accounts for all users. If you have your own domain, you will be able to continue using it when you switch to Microsoft 365 Office. To do so, sign up for an Office 365 account with your primary email address and verify the ownership of the domain during the sign-up process.
Then, ensure that each user is assigned a valid Office 365 license for Outlook and OneDrive. Remember that OneDrive needs to be activated for each user before the migration. To activate OneDrive, instruct each user to sign in to their OneDrive account at least once. Alternatively, you can activate OneDrive accounts for users yourself using the following instructions: Pre-provision OneDrive for users in your organization.
If you are a business owner, you may need to configure roles and permissions for team members before you begin migrating their content.
- Transfer your mailbox(es).
Follow the steps specific to your chosen migration method and resolve any issues if they arise. During the transfer, monitor the process to ensure all selected data is migrating correctly.
- Verify the results.
Confirm that all emails, attachments, folders, and other data were successfully transferred. If you have several users, provide them with instructions for accessing their copied data.
- Change MX records.
After reviewing the results of the migration and when you are ready to start using Office 365, update your domain’s MX records to point to Office 365. Once you've done this, all future emails will be delivered to your new Office 365 mailbox(es) instead of your Gmail account(s).
You can update MX records through your domain registrar or hosting provider. Microsoft provides detailed instructions on setting these records in this article: Add DNS records to connect your domain.
- Terminate your Gmail account.
If you do not plan to continue using your Gmail account, delete the account to avoid unnecessary charges. Remember that the best practice is always to delete unused accounts to prevent identity theft.
We recommend waiting for at least 30 days after the migration before deleting the old account.
Method 1: Migrate from Gmail to Office 365 Small Business or other using VaultMe
The easy way to transfer Gmail business or personal mail to Office 365 is to use VaultMe, a reliable and user-friendly automated migration tool.
Key benefits of using VaultMe:
- The app helps users migrate from personal Gmail accounts to Office 365 as well as from Google Workspace's Gmail to Office 365 for Small Business.
- The app migrates items with correct labels/folders, dates, times, attachments, and formatting.
- VaultMe can copy emails, contacts, calendars, and files—all at the same time.
- No technical expertise is required—just follow a simple step-by-step setup.
- You can continue working with your Gmail account while VaultMe processes your data in the background.
- VaultMe uses advanced encryption and follows strict security protocols to protect your information during migration.
- The app works in the cloud and is fast, saving you lots of time and effort.
While VaultMe is a paid tool, having the job done quickly and accurately always pays off.

To migrate from Gmail to Office 365 Small Business automatically:
- Ensure OneDrive has been activated for all users. To activate OneDrive, sign in to it at least once. If you have several users, sign in to each user's OneDrive account.
- Navigate to the VaultMe app.
- Select whether you want to migrate one or multiple accounts at once. If you choose to migrate several accounts, you will be redirected to VaultMe for Admins, the advanced tool for bulk migrations. For detailed instructions on using VaultMe as your Google Workspace to Office 365 migration tool, see this article: Migrate From Google Workspace to Office 365, Microsoft 365, or Exchange.
- Connect Gmail as your source service provider and Microsoft 365 as your destination service provider.
- Connect the accounts.
- Select the parts of the account that you want to copy to Office 365: emails, files, contacts, calendars, or everything.
- Pay for your migration and start transferring your Google content.
- Feel free to close the browser or even power off your computer! You'll get an email notification once your migration is complete.
- Once the migration is complete, download your migration report and keep it for future reference.
The VaultMe app will not move emails from Gmail to Office 365 Outlook, sync the accounts, or redirect your mail. It will simply copy your Gmail emails to Office 365. If you are using your own domain, you need to change the MX records to point email to Office 365 after the migration.
For more information about VaultMe for Admins, see this page: VaultMe for Businesses.
Method 2: Migrate from Gmail to Office 365 manually for free
If you have only one or two accounts to migrate, you can manually export and import your Gmail emails using a desktop email app like Outlook or Thunderbird.
However, this method has several disadvantages, including the following:
- Your contacts will not be copied along with your emails. If you need to transfer your contacts, this will need to be done separately. For further instructions, see this article: Import Gmail contacts to Outlook.
- The process can take several hours or days; larger accounts may require a week or more.
- Labels, read/unread status, and formatting may fail to transfer.
- Your computer must stay powered on during the whole process.
- The broadband connection must be reliable and uninterrupted.
This is a slow and potentially error-prone process. Ensure you have a backup of your data before you proceed.
To migrate one Gmail mailbox to Office 365 manually:
-
Install the Outlook app on your computer.
-
Sign in to your Gmail and Office 365 Outlook accounts to connect them to the app.
-
In the left-hand menu, select your Gmail account. In the top menu, go to File > Export.
-
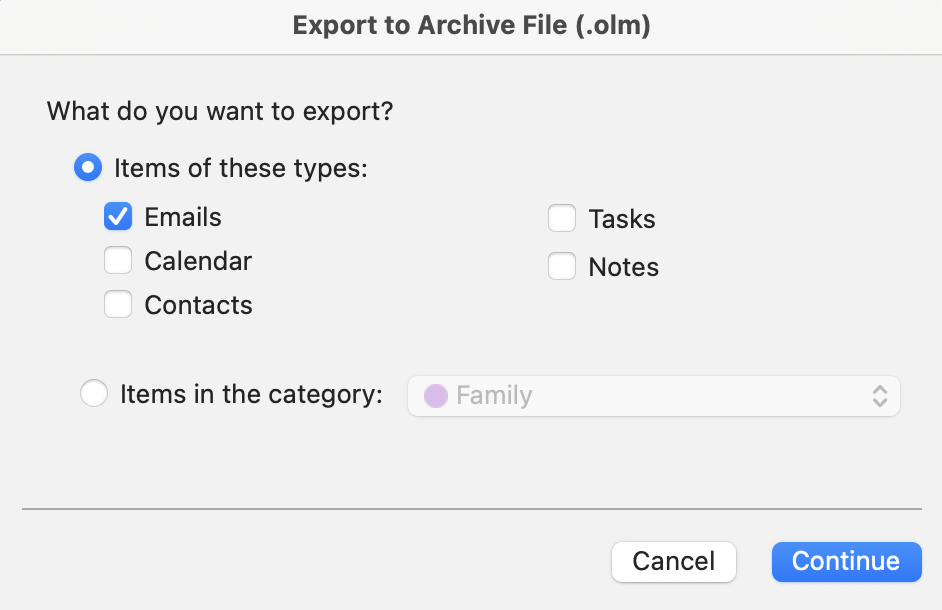
Select "Emails" and click "Continue." Outlook will generate an .olm file (on a Mac computer) or a .pst file (on a Windows machine).

Exporting Gmail emails using the Outlook app -
In the left-hand menu, select your Office 365 account. In the top menu, navigate to File > Import.
-
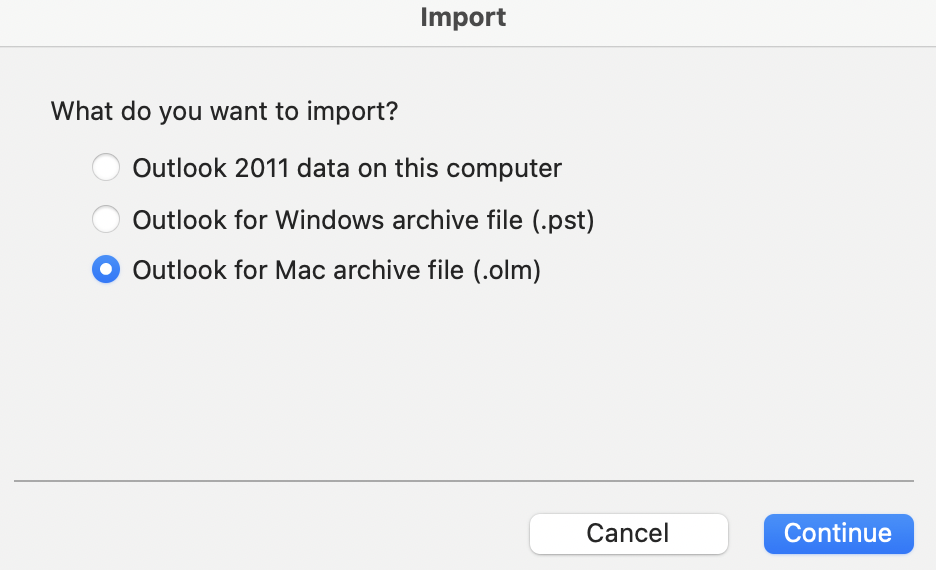
Select the Gmail file that you've previously downloaded.

Importing Gmail emails using the Outlook app -
Wait for the emails to be uploaded to your Office 365 account. Depending on the size of your account, this may take hours or days. Do not shut down your computer and ensure the internet connection is stable at all times.
-
Check the results.
Method 3: Migrate from Gmail to Office 365 using Microsoft's IMAP migration tool
If you have a Google Workspace subscription for your business and want to migrate several Gmail accounts from Google Workspace to Office 365, you can consider using Microsoft's free IMAP mailbox migration tool. For more information, see this article: What you need to know about migrating your IMAP mailboxes to Microsoft 365 or Office 365.
For advanced deployment guides, refer to this guide: Advanced deployment guides for Microsoft 365 and Office 365 products.
Remember that IMAP migrations from Gmail to Office 365 have limitations:
- IMAP migration supports only the transfer of emails. Contacts, calendar items, and files are not migrated.
- A maximum of 500,000 items can be migrated from a user's mailbox.
- If the Gmail account has archival policies that automatically delete or archive emails, these actions can result in items being marked as "missing" during migration.
- If two-factor authentication is enabled for Gmail, you'll need to create an app password to perform the migration.
Note that many paid third-party migration services, including VaultMe, do not have these limitations. VaultMe connects to Gmail accounts using the OAuth 2.0 protocol, which ensures better compatibility with the APIs provided by cloud platforms.
Microsoft does not offer support for free tools. Different types of content need to be transferred separately, and a lot of manual work is required to set up migration for multiple users.
FAQs about Gmail to Office 365 migration
What is a Microsoft equivalent of Gmail?
Microsoft's email service, which is equivalent to Gmail, is Outlook.
How do I import Gmail to Office 365?
You can do that manually by exporting and importing your email or automatically using a paid third-party application. The manual approach is tedious and error-prone, while automatic solutions allow you to get precise results and avoid all manual work. The following article explains both options and provides step-by-step instructions for each of them: Migrate Gmail to Outlook in Two Ways.
Quick resume
Migrating email from Gmail to Office 365 is an important step when switching from Google to Microsoft. While the process may seem daunting, having a proper plan—like the one outlined in this guide—can make it easier to manage.
For a hassle-free experience, consider using automated tools like VaultMe. However, if you prefer to go down the manual route, be prepared for a more time-consuming process and ensure you have a solid backup plan.
Regardless of the method you choose, remember to verify the results thoroughly, update your MX records to redirect email traffic after the migration, and terminate your Gmail account if it will no longer be used.
Related articles
If you are a Microsoft 365 administrator looking for an email migration tool, you can research your options using our guide: How to Choose an Email Migration Tool.
Need to migrate Google Drive files to OneDrive? We explain four options in this article: For Ways to Migrate Google Drive to OneDrive.
Considering using Google Takeout to migrate from Google? Learn more about the pros and cons of this method: Alternative to Google Takeout.
Are you an administrator tasked with migrating Google Workspace to Office 365? Our up-to-date guide provides detailed instructions: Migrate From Google Workspace to Office 365.
Want to transfer your OneDrive files to another account? Know what to expect: Transfer OneDrive Files to Another Account.
Need to change an email address? Learn how you can do that: How to Change Email Address.