Google Workspace Migration: VaultMe's How-to Guide
Google Workspace migration is the process of transferring email, files, calendars, and contacts from another platform into Google Workspace.
This guide explains how Google Workspace migration works, what content can typically be copied, and the main methods available, including Google’s native tools and third-party migration services like VaultMe.
This guide is designed for administrators and organizations planning a secure Google Workspace migration with no downtime and minimal disruption to users.

- 1. Plan your Google Workspace migration
- 2. Choose a Google Workspace migration tool
- 3. Prepare for the Google Workspace data migration
- 4. Transfer user data to Google Workspace
- 5. After you migrate to Google Workspace
- Google Workspace migration best practices
- FAQs about Google Workspace migrations
- Additional resources
- Related articles
- Related videos
1. Plan your Google Workspace migration
Planning is an essential part of the migration process. A proper plan can help you avoid unnecessary work, resolve any issues before they affect your daily work, and be prepared for what happens next.
At this stage of the transition, consider doing the following:
-
Determine what types of data you need to migrate.
While some small businesses only need to migrate email to Google Workspace, others may have also accumulated drive files, contacts, and calendars.
-
Decide how many users you will be migrating.
Create a list of all users that need to be migrated (this should include active and inactive accounts). Decide which user accounts will remain active after the transition, which need to be migrated to an archival mailbox in Google Workspace, and which can be left behind.
-
Decide when you will migrate user data and assess how much time you have or need.
While 1-3 accounts can be migrated over the weekend, larger organizations may need more than a week or two. It's always a good idea to start early and plan extra time for unforeseeable delays.
-
If you already have a domain, decide whether to keep or change it.
You can switch email service providers without changing the domain (i.e., your existing domain can continue working if you decide to switch from Microsoft 365 or another service provider to Google Workspace). However, you can also change it. In this case, you can purchase a new domain from Google when you sign up for Google Workspace.
-
Select your Google Workspace plan and decide how many user accounts you need.
Google's standard price plans for Google Workspace are outlined on this page: Google Workspace pricing plans. However, Google also has special editions for qualifying organizations, such as educational institutions or not-for-profit organizations.
2. Choose a Google Workspace migration tool
Once you've developed a basic transition plan, you must decide how you want to migrate user data.
There are two approaches to transferring existing data to Google Workspace: using a third-party Google Workspace migration tool like VaultMe for Admins or utilizing Google's free native migration services.
When deciding between Google's free migration tools and a paid third-party cloud migration tool, there are several factors you should consider:
-
Ease of use.
Google's native tools require more manual work and offer limited flexibility. In contrast, third-party tools often have user-friendly interfaces with guided workflows and automation that reduce the amount of manual work involved. If you or your team have limited technical expertise, a third-party tool might be more suitable for your business situation.
-
Reliability and support.
Google's native tools might not be as robust in handling complex migration scenarios or large data volumes, and support for free tools may be limited. Third-party tools are often more reliable, especially for large-scale or complex migrations involving multiple types of data (emails, contacts, calendars, files). Some Google Workspace migration services, including VaultMe for Admins, offer dedicated support, including pre-migration assessments and post-migration troubleshooting, should the need arise.
-
Price.
Google's tools are included with the Google Workspace subscription, so there's no additional cost. Third-party tools typically involve additional costs, which vary based on the tool, the number of users, and the complexity of the migration. If budget is a significant concern and your migration is straightforward, Google's free tools might be sufficient. However, the added cost of a third-party tool might be justified by the time saved and the reduced risk of issues during the migration.
In this article, we are comparing VaultMe for Admins with Google's free data migration service, but there are also other tools you can consider for your project.
Option 1: Migrate email and other data to Google Workspace with VaultMe for Admins
VaultMe for Admins is a cloud-to-cloud migration tool designed to transfer user content. It offers advanced migration options and automates the transfer of emails, files, contacts, and calendars between different accounts or service providers.

Pros of VaultMe for Admins:
- Supports hundreds of email service providers
- Supports file migrations from Google Workspace and Microsoft OneDrive accounts
- Migrates users in easy-to-set-up batches
- Provides precise results, even for extra-large accounts
- Shows real-time migration progress
- Offers free sync-ups within 30 days of the migration date
- Generates detailed migration reports for each user
- Includes dedicated premium support
Cons:
- Paid service
Learn how you can benefit from using VaultMe for your migration project: VaultMe for Business.

Instructions for setting up a VaultMe for Admins migration will be outlined in one of the next sections of this guide.

Option 2: Migrate email to Google Workspace with Google's migration service
Data Migration Service is a built-in tool in Google Workspace that allows you to "migrate your users' email data to Google Workspace from another Google Workspace account, a Microsoft Exchange Online account, an IMAP account, or a single user's Gmail account," according to Google Workspace's support documentation.
Pros:
- Free service
Cons:
- Each type of content (Gmail, Contacts, Calendars) needs to be transferred separately.
- File migrations are not supported.
- Large accounts may fail to transfer accurately, according to Reddit users.
- A lot of manual setup is required.
- Support for free transfers is limited, so any Google Workspace migration failures will require a lot of troubleshooting.
To check if this tool will work for your project, see Google's help article: Is the data migration service right for my organization?
VaultMe does not provide support for the configuration of Google Workspace accounts or migrations using Google's data migration service. Contact Google Workspace support with any questions about Google's native tools or the configuration of your Google Workspace account.
3. Prepare for the Google Workspace data migration
Now that you've selected your migration tool, you can start preparing for your transition.
Here's what you need to do:
-
Sign up for Google Workspace and set up your organization's account.
To sign up, navigate to the Google Workspace sign-up page.
During the sign-up process, you will need to provide information about your organization, verify the ownership of the domain, and set up billing. If you are having trouble verifying your domain, refer to Google's troubleshooting page: Can't sign up my domain for a Google service.
If you are not changing your domain name and user email addresses, do not activate Gmail at this stage. Otherwise, new emails will start arriving in Gmail right away, and your old email accounts will stop working. You will be able to activate Gmail by changing MX records after you have migrated your content and are ready to start using Gmail instead of your old email service.
After verifying the domain, set up a super admin account (this may include safeguarding the account and enabling email alerts) and configure the security settings of your Google Workspace by adding SPF, DKIM, and DMARC records.
Signing up for Google Workspace and configuring the super admin account are important steps that may require more time than expected. Plan at least several days for this task.
-
Create user accounts.
For instructions on how to add users to your Google Workspace account, see this article: Add an account for a new user.
-
Ensure that the limitations of the destination accounts will be met.
Before migrating any user accounts to Google Workspace, you need to make sure that the destination accounts are ready to receive all of the content that you are planning to migrate. This may include ensuring that each account has enough free storage space for emails, Drive files, contacts, and calendars, and that each user in the source accounts has less than 10,000. Google Workspace allows creating no more than 10,000 contacts, so users may need to delete or merge some of the contacts prior to the migration.
-
Ensure that all users have enough free storage space for the migration.
Before you begin migrating user data, review the largest accounts and ensure that these users will have sufficient storage space in the destination.
-
Notify users of the upcoming change.
Ensure that users know of the change and instruct them to minimize using their accounts during the migration process on the scheduled days.
-
Back up any critical data (optional).
While neither VaultMe for Admins nor Google's data migration service removes the data from the source accounts, backing up any critical data is a reasonable step during the transition period.
4. Transfer user data to Google Workspace
Before beginning your migration process, ensure all critical tasks are completed, users are informed of the timeline, and backups are created.
Option 1: Migrate your organization's data with VaultMe for Admins
Even though VaultMe migrations do not cause downtime, we recommend transferring user data during the weekends to minimize any disruptions to daily operations.
To migrate email and files to Google Workspace:
-
Navigate to the app.
-
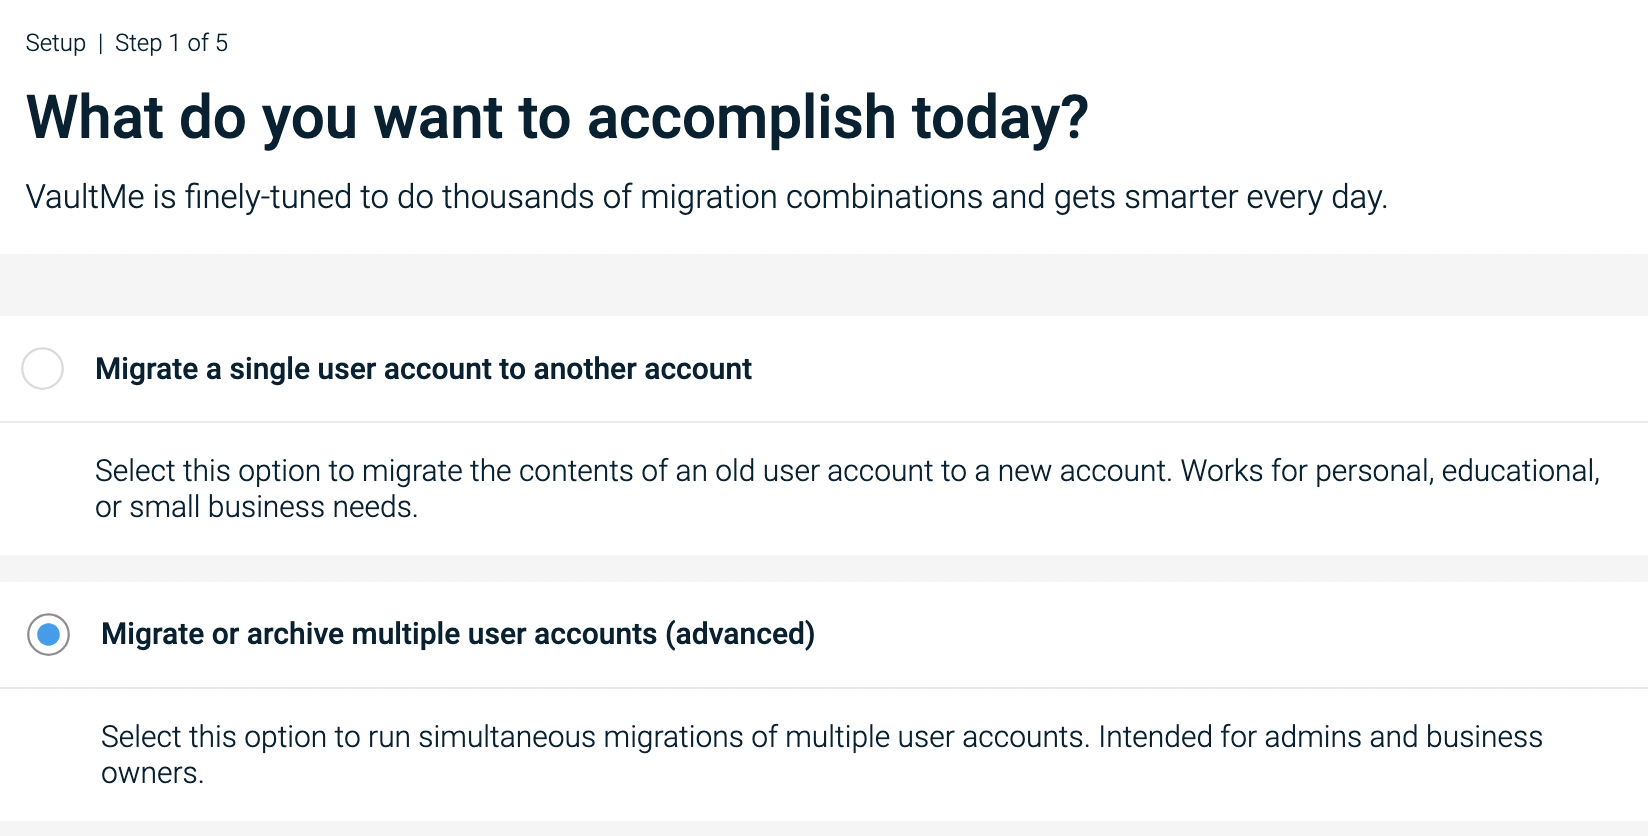
Select "Migrate or archive multiple user accounts (advanced)."
How to sign up for VaultMe for Admins -
Create a VaultMe for Admins account.
-
Select your source and destination service providers. If your source email service provider is not listed among the popular accounts, select "IMAP."
-
Connect your source accounts and destination accounts. Depending on your service provider, you may be limited to manually connecting each source account.
-
Map users.
-
Select what types of content you want to copy. If you are migrating from IMAP accounts, you will be limited to copying only emails.
-
Decide how you want your content to be organized after the migration.
-
Let the app calculate the final fee and proceed to checkout. (Our prices are outlined on this page: https://www.vaultme.com/pricing. Refer to the VaultMe for Admins pricing.)
-
Start your Google migration. You can now close your browser or even power off your computer.
After your migration is complete, you will have 30 days to sync up changes between the accounts if needed.
Option 2: Migrate email to Google Workspace using Google's migration tool
Use the following Google guides to migrate each part of the account to Google Workspace separately:
- Migrate Email to Google Workspace
- Migrate Contacts
- Migrate Calendars
To download the Google Workspace Migration for Microsoft Outlook tool, navigate to the following page: Google Workspace Migration for Microsoft Outlook.
If you are not an administrator, the instructions for Google Workspace users are outlined on the following page: Download, install, & import.
Remember to review system requirements before installing Google Workspace Migration for Microsoft Outlook. Remember that an inappropriate configuration may result in partial transfers and data loss.
VaultMe does not provide support for migrations using Google's data migration service. Contact Google Workspace support with any questions about Google's native tools or your ongoing migration.
5. After you migrate to Google Workspace
Once you've migrated user content, consider taking the following steps:
-
Review the results.
You'll need to compare the data in the source accounts with the migration results in the destination accounts. If you've used VaultMe for Admins to transfer user data, download the migration reports containing the list of all migrated items and keep them for future reference.
-
Train users.
Before fully switching to Google Workspace, ensure that your users are comfortable with the new service and know how to use the features offered by Google Workspace. You can use Google's free guide for training: Train your Google Workspace users.
-
Update DNS Records.
When you are ready to permanently switch to Google Workspace, modify your domain's DNS records to point to Google Workspace. Specifically, you must update the MX records to direct email to Google's servers. This will activate Gmail for your Google Workspace account. Google provides registrar-specific instructions for updating MX records in the following article: Activate Gmail for Google Workspace.
-
Finalize Google Workspace settings.
Adjust any final settings in Google Workspace, such as adding the company logo and setting up email forwarding, auto-replies, and signatures.
-
Decommission the old system.
After a reasonable period, once you are sure everything is working well in Google Workspace, decommission the old system. Avoid deleting your source accounts immediately after the migration since, in some cases, changes cannot be reverted. We recommend waiting 30-60 days before permanently deleting the old system.
Google Workspace migration best practices
While each project is unique, here are some best practices:
- Start with a few accounts or non-critical departments to test the process and/or the migration tool of your choice.
- Decide whether to migrate all at once or in stages (e.g., by department). Each approach has its pros and cons. Some tools, such as VaultMe for Admins, offer free sync for 30 days after the migration date, so we generally recommend migrating users in stages (batches) and then running a delta migration once all data has been transferred.
- Save your MX/DNS configurations in a blank document before the cutover. This will help you configure your destination with no issues.
- Send regular updates to stakeholders and end users.
FAQs about Google Workspace migrations
How to get Google Workspace for free?
Currently, Google Workspace offers basic accounts for non-profit organizations free of charge. Google Workspace Essential Starter is a free service as well. However, only some people meet the requirements for these plans.
Can I migrate Gmail accounts to Google Workspace?
Yes, you can migrate personal Gmail accounts to Google Workspace. The easy way is to use a third-party migration tool, but Google also offers a free migration service that may work for some projects.
How do I transfer Gmail accounts to Google Workspace?
If you are a small business owner and you want to transfer your employees' personal Gmail accounts to Google Workspace, you won't be able to simply upgrade each of the accounts. You must create a Google Workspace account, set up user accounts, and then migrate users' data from their personal email accounts to Google Workspace. There are several tools for Google Workspace migrations, including Google's native tools and third-party migration apps like VaultMe.
Additional resources
Do you need help with your Google Workspace account? Google offers dedicated support for Google Workspace users. You can start here: Contact Google Workspace support.
If you have a question that you'd like to discuss with Google Workspace experts or fellow Google Workspace admins, join the Google Workspace Admin Community.
If you are a registered not-for-profit organization, you may be eligible for a free Google for Non-Profits plan. Check your eligibility using this page: Google Grant Application.
Related articles
Want to migrate from one Google Workspace account to another? Learn what steps you need to take: Transfer Google Workspace to Another Account.
Want to transfer Zoho Mail mailboxes to Google Workspace? Use VaultMe's detailed guide: Migrate From Zoho to Google Workspace (G Suite).
Need to migrate GoDaddy accounts to Google Workspace? This article explains your options: Transfer GoDaddy Email to Gmail or Google Workspace (G Suite).
If you are looking for an email migration tool as an administrator, review the options outlined in our guide: How to Choose an Email Migration Tool.
Need to migrate not only owned but also shared files to Google Workspace? Find out what challenges you may face: How to Copy "Shared with me" Files from One Google Drive to Another.
Need to move Google Photos to a different account? Explore your options using this guide: How to Transfer Google Photos to Another Account.
Are you considering using Google Takeout for your migration project? Learn what to expect: Alternative to Google Takeout.
Related videos
Video Guide: Email Migration Tools and Services
Video Guide: How to Migrate Google Workspace to Office 365 or Microsoft 365